WordPress Creating Menus in WordPress
Creating your first Menu
What is the menu:
A menu is a controlled graphical element used in GUI (Graphical User Interfaces). A menu is the list of options or commands for the users to select the proper application function. It the common feature of OS, software applications, and web-based apps. We can also add many types of menus in WordPress.
Creating Menu in WordPress:
To customize the default menu in WordPress, follow the steps:
- Go to the WordPress Dashboard
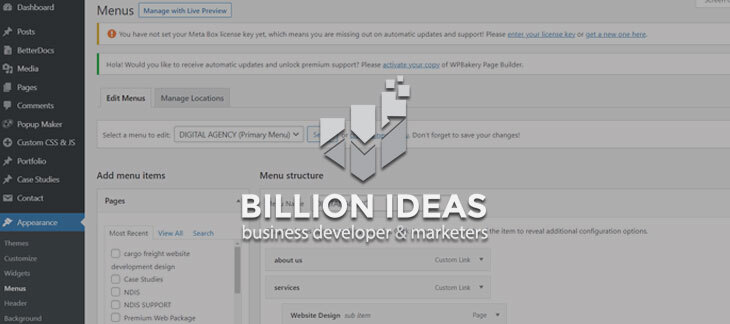
- Click on the Appearance from the sidebar
- Click on the Menus option.
- Then a new window will appear.
- Firstly give the Menu Name.
- Click the Create Menu button. The menu will be created.

Creating menus in WordPress | billionideas.co
- After creating Menu. You may start adding the items to the menu.
- All your menus like Home Page, Blogs will be created.
- Then you need to click page option from the sidebar and click on View All, all the pages will appear which you created and then select them and add to the menu by clicking Add to Menu button.
Adding Pages, Posts, and Categories to Your Menu:
How to Add pages to a menu:
Steps to add the page in WordPress menu:
- Open Menus from WordPress.
- Create the New Menu and set the Menu Name.
- Select the View All to list of all currently published Pages on your site.
- Select the pages you want to add to the menu.
- Click the button Add to Menu which is located in the bottom side of the pane to add your selected items to the menu that you created in the previous.
- Click to the button Save menu once you added the items which you want.

Adding Pages | billionideas.co
- After selecting the Menu, you also switch their order as you want by dragging them to the desired location. This is how you organize your custom menu.

Adding Pages | billionideas.co
How to Add Post in Menu:
Steps to add the page in WordPress menu:
- Open Menus from WordPress.
- Create the New Menu and set the Menu Name.
- Select the View All to list of all currently published Posts on your site.
- Select the posts you want to add to the menu.

Adding Posts | billionideas.co
- Click the button Add to Menu which is located in the bottom side of the pane to add your selected items to the menu that you created in the previous.

Adding Post | billionideas.co
- Click to the button Save menu once you added the items which you want.

Adding Post | billionideas.co
- After selecting the Menu, you also switch their order as you want by dragging them to the desired location. This is how you organize your custom menu.
How to Add Category in Menu:
Steps to add Categories in WordPress menu:
- Open Menus from WordPress.
- Create the New Menu and set the Menu Name.
- Select the View All to list of all currently saved categories on your site.
- Select the categories you want to add to the menu.
- Click the button Add to Menu which is located in the bottom side of the pane to add your selected items to the menu that you created in the previous.
- Click to the button Save menu once you added the items which you want.

Adding Categories | billionideas.co
- After selecting the Menu, you also switch their order as you want by dragging them to the desired location. This is how you organize your custom menu.
Enabling Advanced menu options:
To add the advance menu, follow steps:
- Access the settings, log into your WordPress admin panel and attend the looks > Menus tab.
- To alter advanced choices, click the Screen choices change posture within the top-right corner of your screen.

Advance Menu Option | billionideas.co
You will see Link Target, CSS categories, Link Relationship (XFN), and outline choices.

Advance Menu Option | billionideas.co
Link Target:
This option controls whether or not the link opens in an exceedingly new browser tab. check the Link Target advanced property at intervals Screen choices to alter this setting for the individual menu item.
Expand any menu item, check the Open link in an exceedingly new window/tab choice.

Link Target | billionideas.co
CSS category Option:
CSS categories choice permits you to use a CSS category to individual menu things and build the menu vogue piece of writing method a lot of easier.
- Check the CSS categories advanced property at intervals Screen choices section.
- Open any menu item to feature css category.

CSS Category Option | billionideas.co
Link Relationship XFN:
Link Relationship (XFN) choice permits the generation of XFN (XHTML Friends Network) attributes, thus you’ll be able to show however you’re associated with the authors of the location to that you’re linking. this selection is typically used for external links.
- Tick the Link Relationship (XFN) property at intervals Screen choices section.
- Expand specific item within the menu and specify the link in Link Relationship (XFN) field.

Link Relationship | billionideas.co
Description:
You can add the menu description. Menu item description is displayed if this theme supports it.
- Check the outline advanced property at intervals Screen choices section.
- Expand the menu item you’d wish to add the description too. Enter your description beneath

Description | billionideas.co
Adding custom links to your menus:
What are Custom Links:
Custom menu is the list of that are usually displayed in the site as the main navigation link. The location for the menu must depend on the theme and the theme looks. And some themes can offer the additional menu for the social sites in which the links can appear.
How to add Custom Links to the Menu:
Steps to add custom links:
- Log into your WordPress administration panel. Navigate to Appearance, and select Menus:

Add Custom Links | billionideas.co
2. Navigate to Links on the left and type in the URL you want to have for this menu button, add link text to specify what the tab will say, and then click Add to Menu.

Add Custom Links | billionideas.co
3. If you would like to control weather when you open the link it can open in the new tab then you choose the option that opens in new tab, check the “Link Target” this setting on individual menu items:

Add Custom Links | billionideas.co
4. Refresh the site and you will see your new custom page and link in the navigation
For the Guidance to Install WordPress Click Here
To read How to Create Pages in WordPress click here
To read How to Configure Website Setting in WordPress click here